Would you prefer to listen to a short podcast discussion about this wormery article? Click on the audio below.
Vermicomposting is an excellent way for gardeners in the UK to use a wormery to produce nutrient-rich compost while reducing their environmental impact. This eco-friendly practice involves the use of worms to break down organic waste materials into a valuable soil amendment known as vermicompost. In this comprehensive blog, we will explore the ins and outs of vermicomposting, providing gardeners with all the necessary information to get started and maximize the benefits of this sustainable gardening practice.
I. Introduction to Vermicomposting
Definition of Vermicomposting
Vermicomposting is a process that utilizes specific species of earthworms to decompose organic matter, such as kitchen scraps, yard waste, and shredded paper, into a nutrient-rich soil amendment called vermicompost. These earthworms, commonly known as composting worms or red wigglers, play a vital role in breaking down organic waste through their feeding and burrowing activities.
Benefits of Vermicomposting for Gardeners
Vermicomposting offers numerous benefits for gardeners in the UK. Firstly, it provides an efficient and natural way to recycle kitchen and garden waste, reducing the amount of organic matter that ends up in landfills. This helps to mitigate greenhouse gas emissions and contributes to a healthier environment. Secondly, vermicompost is a nutrient-rich fertilizer that improves soil structure, enhances nutrient availability, and promotes healthy plant growth. Lastly, a wormery is a cost-effective method that allows gardeners to produce their own organic compost without the need for expensive equipment or chemical additives.
Why Vermicomposting is Popular in the UK
Vermicomposting has gained popularity among UK gardeners due to its ability to address specific challenges faced by gardeners in the region. The UK experiences a cooler climate, and traditional composting methods may be slower or less effective during colder months. A wormery, however, can be done indoors or in controlled environments, providing gardeners with a year-round composting solution. Furthermore, vermicomposting allows gardeners with limited outdoor space.
II. Getting Started with Vermicomposting
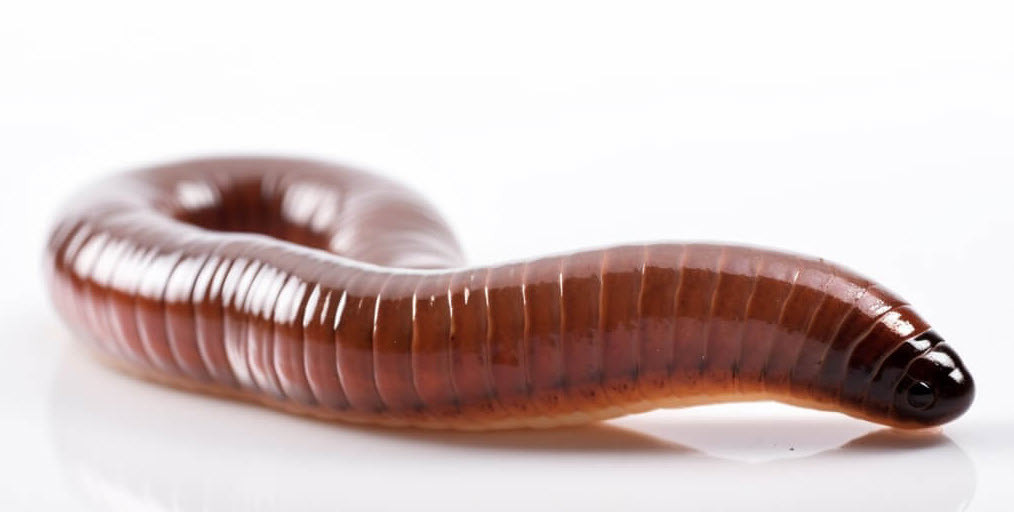
Selecting the Right Worm Species
When starting with a wormery, it’s essential to choose the appropriate worm species for the job. The most common worm species used in a wormery are Eisenia fetida, also known as red wigglers or red worms. These worms have a voracious appetite, reproduce quickly, and thrive in organic waste environments. They are well-suited for the vermicomposting process and are readily available from worm suppliers.
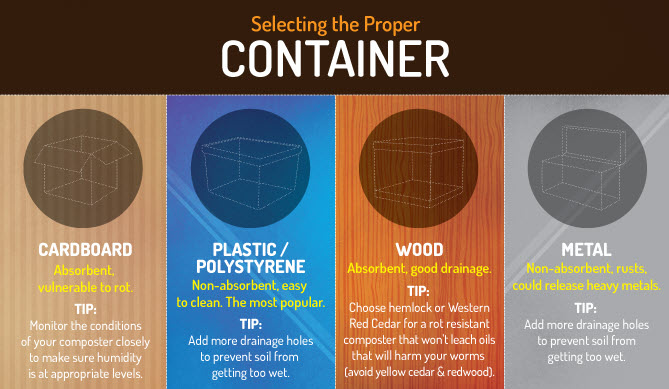
Choosing the Appropriate Wormery Bin
To create a successful wormery, selecting the right bin is crucial. There are various options available, including commercial worm bins, DIY bins, and even repurposed containers. The bin should have adequate ventilation, drainage holes, and a lid to maintain optimal conditions for the worms. Consider the size of the bin based on the amount of organic waste you generate and the space available for vermicomposting.
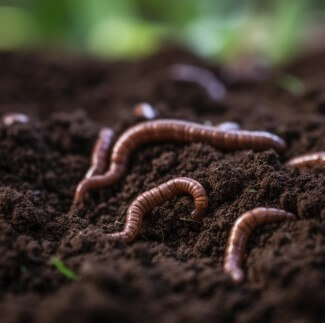
Creating a Suitable Bedding for Worms
Worms need comfortable and nutritious bedding to thrive in the wormery. Good bedding materials include shredded newspaper, cardboard, coconut coir, or a mixture of these. Dampen the bedding materials and fluff them up to provide a loose and fluffy environment for the worms to move and breathe easily.
Adding Organic Waste Materials to Your Wormery
Once the wormery and bedding are ready, it’s time to start adding organic waste materials. Kitchen scraps like fruit and vegetable peelings, coffee grounds, tea bags, and crushed eggshells are excellent choices. Avoid adding meat, dairy, oily foods, and pet waste as they can attract pests or create unpleasant odours. Gradually introduce the organic waste into the bin, burying it under the bedding to prevent fruit flies and odours.
III. Maintaining the Wormery
Optimal Temperature and Moisture Levels
Maintaining the proper temperature and moisture levels is crucial for a thriving vermicomposting system. The ideal temperature range for composting worms is between 55°F and 77°F (13°C and 25°C). Avoid exposing the worms to extreme heat or cold. Additionally, maintain moisture levels similar to a wrung-out sponge. Mist the bedding with water if it becomes too dry or add dry bedding if it becomes too wet.
Providing Adequate Ventilation
Good ventilation is essential to prevent the buildup of anaerobic conditions that can harm the worms. Ensure the vermicomposting bin has sufficient airflow through ventilation holes or a breathable lid. This helps prevent foul odours and creates an oxygen-rich environment for the worms.
Balancing the Carbon-to-Nitrogen Ratio
To maintain a healthy wormery, it’s important to balance the carbon-to-nitrogen ratio in the bin. Aim for a ratio of roughly 30:1, with carbon-rich materials (such as shredded paper or cardboard) providing the bedding and nitrogen-rich materials (like kitchen scraps) serving as the food source for the worms. This balance ensures proper decomposition and prevents odours.
Avoiding Potential Issues and Troubleshooting
In vermicomposting, it’s common to encounter a few challenges along the way. Avoid overfeeding the worms, as excess food can lead to odours, fruit flies, or acidic conditions. If the wormery becomes acidic, add crushed eggshells or dolomite lime to neutralize the pH. If pests like fruit flies or mites appear, bury the food deeper, cover it with bedding, or reduce the moisture level. Regularly monitor the vermicomposting system and address any issues promptly to maintain a healthy environment for the worms.
IV. Harvesting and Using Vermicompost
Signs of Mature Vermicompost
Vermicompost is ready to be harvested when it turns dark, crumbly, and earthy in texture. The original organic materials should be unrecognizable, indicating that the worms have thoroughly processed them. You may also notice a reduction in worm activity near the surface as they move deeper into the bedding.
Methods for Harvesting Vermicompost
There are several methods you can use to harvest vermicompost from your wormery. One common technique is called “separation.” Start by pushing all the vermicompost to one side of the bin. Add fresh bedding and food to the other side, which will encourage the worms to migrate to the new area. After a few weeks, you can scoop out the harvested vermicompost from the side with minimal worm activity.
Another method is called “light sorting.” Spread a thin layer of vermicompost on a plastic sheet under bright light. Worms are photophobic and will burrow deeper into the compost to avoid light. As you remove the top layer, the worms will retreat, allowing you to collect the vermicompost.
Applying Vermicompost in the Garden
Vermicompost is a valuable amendment to your garden soil. It enriches the soil with beneficial microorganisms, improves its structure, and enhances moisture retention. Before planting, incorporate vermicompost into the soil by mixing it thoroughly. You can also use it as a top dressing around existing plants to provide a slow-release nutrient source.
Additional Uses for Vermicompost
Apart from garden use, vermicompost has various applications. It can be used to make compost tea, a liquid fertilizer obtained by steeping vermicompost in water. Compost tea provides a nutrient boost to plants and can be applied through foliar spraying or as a soil drench. Vermicompost can also be used for seed starting, creating potting mixes, or enhancing the growth of indoor plants.
V. Tips and Best Practices
Avoiding Certain Materials in Vermicomposting
While many organic materials are suitable for vermicomposting, there are some items you should avoid. These include meat, dairy products, oils, fatty foods, and pet waste. These materials can attract pests, produce foul odours, or disrupt the balance in the vermicomposting bin.
Managing Odor and Pest Control
Proper vermicomposting should not produce strong smells. If you notice unpleasant smells from your wormery, check for overfeeding, excessive moisture, or improper aeration. Adjust these factors accordingly to eliminate odours. To control pests like fruit flies or mites, ensure that the vermicomposting bin is covered and secure. Bury food scraps properly, and avoid overripe or mouldy fruits and vegetables.
Regular Monitoring and Maintenance
Maintaining a healthy wormery requires regular monitoring. Check the moisture levels, temperature, and overall well-being of the worms. Monitor the carbon-to-nitrogen ratio and adjust the feeding accordingly. Inspect the bin for any issues or signs of pests. With consistent monitoring and maintenance, you can ensure the success of your vermicomposting endeavours.
Enhancing Vermicomposting with Compost Tea
Compost tea is a powerful liquid fertilizer that can be made from vermicompost. Steep a small amount of vermicompost in water for a specified duration, strain the liquid and apply it to your plants. Compost tea boosts nutrients, beneficial microorganisms, and enzymes, promoting healthy plant growth and disease resistance.
VI. Vermicomposting FAQs
How Long Does It Take to Produce Vermicompost?
The time it takes to produce vermicompost depends on various factors such as the size of the wormery, the number of worms, the types of organic waste added, and the environmental conditions. Typically, it can take anywhere from two to six months for the worms to convert the organic waste into mature vermicompost. Regular feeding, maintaining optimal conditions, and proper management will help speed up the process.
What Should I Do If My Worms Escape from the Bin?
Worms escaping from the wormery can happen occasionally. If you find worms outside the bin, gently gather them and place them back into the bin. It’s important to identify the reason for the escape. Check if the bin is too wet, lacks proper bedding, or has inadequate ventilation. Make the necessary adjustments to ensure the worms stay in their designated environment.
Can I Vermicompost in Cold Weather?
Vermicomposting can be done in cold weather, but it requires additional precautions. Worms are sensitive to extreme temperatures, so it’s crucial to provide insulation to keep them warm during winter. Move the wormery to a protected area or consider using insulating materials such as foam or straw. Monitor the temperature regularly and make adjustments as needed to maintain a suitable environment for the worms.
Conclusion
Vermicomposting is a valuable technique for gardeners in the UK to recycle organic waste, improve soil fertility, and promote sustainable gardening practices. By understanding the fundamentals of vermicomposting, selecting the right worm species, maintaining the wormery, and utilizing the resulting vermicompost, gardeners can enjoy the benefits of this eco-friendly method. Remember to monitor the conditions, balance the carbon-to-nitrogen ratio, and troubleshoot any issues that may arise. Embrace vermicomposting as an effective way to reduce waste, nourish your plants, and contribute to a greener future.
FAQs
1. Can I vermicompost indoors?
Yes, vermicomposting can be done indoors using a suitable wormery and proper maintenance. However, we would not advise it unless it is n a garage or outhouse.
2. How long does it take to produce vermicompost?
The time to produce vermicompost can vary, but it usually takes two to six months under optimal conditions.
3. What should I do if my worms escape from the bin?
Gather the escaped worms and assess the bin’s conditions to prevent further escapes.
4. Can I vermicompost in cold weather?
Yes, you can vermicompost in cold weather by providing insulation and maintaining suitable temperatures.
5. How do I know if my vermicompost is ready to use?
Mature vermicompost has a dark, crumbly texture and an earthy smell. The original organic materials should be well decomposed, and you should no longer be able to recognize them. The presence of earthworm cocoons is also a good indicator of mature vermicompost. When you see these signs, it means your vermicompost is ready to be used in your garden.
6. Can I use vermicompost for potted plants?
Absolutely! Vermicompost is excellent for potted plants. It enriches the soil, improves drainage, and provides essential nutrients for plant growth. Mix vermicompost with potting soil in a ratio of 1:3 and use it as a growing medium for your potted plants. The vermicompost will enhance the overall health and vitality of your plants.
7. Can I add citrus peels and onions to my wormery?
It’s best to avoid adding large quantities of citrus peels and onions to your wormery. These materials contain high levels of acidity, which can potentially harm the worms and disrupt the balance in the bin. If you do want to add them, make sure to cut them into small pieces and mix them well with other organic materials to minimize any adverse effects.
8. How often should I feed my worms?
The feeding frequency depends on the size of your worm bin and the number of worms. As a general guideline, feed your worms small amounts of organic waste once or twice a week. Monitor their feeding habits and adjust the amount accordingly. Avoid overfeeding, as it can lead to unpleasant smells and attract pests. Remember to bury the food scraps under the bedding to prevent fruit flies and other insects.
9. Can I use vermicompost for seed starting?
Yes, vermicompost is great for seed starting. It provides a rich source of nutrients and beneficial microorganisms that promote seed germination and seedling growth. Mix vermicompost with potting soil in a ratio of 1:3 and use it as a seed starting mix. The vermicompost will help nourish the young seedlings and give them a healthy start.
10. Can I use vermicompost on my lawn?
Certainly! Vermicompost can be used on lawns to improve soil health and promote lush, green growth. Spread a thin layer of vermicompost evenly over your lawn and gently rake it in. The nutrients and organic matter in the vermicompost will gradually release into the soil, benefiting the grassroots. Regular applications of vermicompost will help maintain a healthy and vibrant lawn.
12. Can I vermicompost meat or dairy products?
It’s generally best to avoid adding meat, dairy products, and oily foods to your vermicompost. These items can attract pests and cause unpleasant odours. Stick to vegetable and fruit scraps, coffee grounds, tea leaves, and other organic materials that are safe and suitable for the worms.
13. How do I prevent odours in my vermicomposting bin?
To prevent odours in your vermicomposting bin, make sure to balance the moisture levels and avoid overfeeding. Bury the food scraps under the bedding to discourage fruit flies and other pests. If you notice a foul smell it may indicate that the bin is too wet or has an imbalance of materials. Adjust the conditions accordingly to eliminate the odour.
14. Can I use vermicompost for indoor plants?
Yes, vermicompost is excellent for indoor plants. It improves soil quality, provides nutrients, and enhances plant growth. Mix vermicompost with potting soil in a ratio of 1:3 and use it for repotting or as a top dressing for your indoor plants.
15. How do I harvest vermicompost from my bin?
To harvest vermicompost, stop feeding the worms for a few weeks to allow them to consume the remaining organic waste. Then, use the migration method by creating a new pile of fresh bedding and food on one side of the bin. The worms will migrate to the new pile, leaving the finished vermicompost behind. Scoop out the vermicompost and store it in a container for use in your garden.
Now that you have a thorough understanding of vermicomposting for gardeners in the UK, you can confidently embark on your vermicomposting journey.
If you need any further information or assistance with this article, don’t hesitate to Contact Us